A Program Stops Responding or CPU Usage Approaches 100 Percent When You Unplug a USB Microphone in Windows 2000 or Windows XP

When you unplug a Universal Serial Bus (USB) microphone, you may experience any of the following symptoms:
  • A program that is currently using the microphone (such as Microsoft NetMeeting, GraphEdit from the Microsoft DirectShow SDK, or AmCap from the DirectShow SDK) may stop responding.
  • Your computer's CPU usage may approach 100 percent.
cause

Microsoft has confirmed that this problem occurs in Windows 2000 if you unplug a microphone that uses the Microsoft Usbaudio.sys driver while the microphone is being used by a program. This problem may also occur in Windows XP.

To work around this problem, do not unplug a USB microphone when audio is being played back. You might also be able to work around this problem by installing the End-User Runtime package.

The following file is available for download from the Microsoft Download Center:
Collapse this imageExpand this image
Download
Download the DirectX 9.0a End-User Runtime package now. (http://www.microsoft.com/downloads/details.aspx?familyid=886ACB56-C91A-4A8E-8BB8-9F20F1244A8E&displaylang=en)
For additional information about how to download Microsoft Support files, click the following article number to view the article in the Microsoft Knowledge Base:
119591  (http://support.microsoft.com/kb/119591/EN-US/ ) How to Obtain Microsoft Support Files from Online Services
Microsoft scanned this file for viruses. Microsoft used the most current virus-detection software that was available on the date that the file was posted. The file is stored on security-enhanced servers that help to prevent any unauthorized changes to the file.

Csrss.exe uses 100% of the CPU When you Right-Click an item in Explorer

Csrss.exe uses 100% of the CPU When you Right-Click an item in Windows Explorer or on the desktop
Before continuing, make sure you have backed up the contents of your My Documents folder, and any other important data stored in your profile such as application settings. Once your profile is deleted, you will not be able to recover data stored inside of it.

In order to delete your profile, you must be logged in with an account which has administrative privileges which is also not yours. Once you are logged in, open the user profiles list. To locate the list of local user profiles, right-click My Computer, click Properties, and then on the Advanced tab, click Settings under User Profile. Select your profile from the list, and then click Delete.

Logoff, and then log back on as yourself. A new profile will be created when you log on.

CAUTION
If the corrupted profile is that of a domain administrator, and it is located on the first domain controller in the forest, the EFS recovery key must first be backed up. See KB Article 324897 for details on this procedure.

How to fix CPU 100 % usage

When you run programs, CPU utilization reaches 100 percent. When CPU utilization reaches 100 percent, programs either run slowly or stop responding (hang).

Note To view CPU utilization, press CTRL+ALT+DEL, click Task Manager, and then click the Performance tab.

On multiprocessor computers, you may experience many context switches each second or many system calls each second.

These symptoms occur after you install Microsoft Windows XP Service Pack 2 (SP2).

cause

This problem occurs because of the user interface code that is included in Windows XP SP2. The high CPU utilization is caused by the additional overhead that occurs when the IsWindow function is called by the user interface code

Hotfix information

A supported hotfix is available from Microsoft. However, this hotfix is intended to correct only the problem that is described in this article. Apply this hotfix only to systems that are experiencing this specific problem. This hotfix might receive additional testing. Therefore, if you are not severely affected by this problem, we recommend that you wait for the next software update that contains this hotfix.

If the hotfix is available for download, there is a "Hotfix download available" section at the top of this Knowledge Base article. If this section does not appear, contact Microsoft Customer Service and Support to obtain the hotfix.

Note If additional issues occur or if any troubleshooting is required, you might have to create a separate service request. The usual support costs will apply to additional support questions and issues that do not qualify for this specific hotfix. For a complete list of Microsoft Customer Service and Support telephone numbers or to create a separate service request, visit the following Microsoft Web site:
http://support.microsoft.com/contactus/?ws=support (http://support.microsoft.com/contactus/?ws=support)
Note The "Hotfix download available" form displays the languages for which the hotfix is available. If you do not see your language, it is because a hotfix is not available for that language.

Prerequisites

To apply this hotfix, you must have Windows XP SP2 installed.

Restart requirement

You must restart the computer after you apply this hotfix.

Hotfix replacement information

This hotfix does not replace any other hotfixes.

File information

The English version of this hotfix has the file attributes (or later file attributes) that are listed in the following table. The dates and times for these files are listed in Coordinated Universal Time (UTC). When you view the file information, it is converted to local time. To find the difference between UTC and local time, use the Time Zone tab in the Date and Time item in Control Panel.
Date         Time   Version            Size    File name
   --------------------------------------------------------------
   30-Mar-2005  19:53  5.1.2600.2643     577,024  User32.dll       
   30-Mar-2005  01:30  5.1.2600.2643   1,836,544  Win32k.sys
   

Microsoft Visio C++ Runtime Error

You receive a "Microsoft Visio C++ Runtime Error" error message when you move a Dynamic connector to a different connection point

When you move a Dynamic connector shape to a different connection point on a shape in your cross-functional flowchart, you may receive an error message similar to one of the following:

Microsoft Visio C++ Runtime Library
Runtime Error!
Program: Drive:\Program Files\Microsoft Office\Visio10\Visio.exe
abnormal program termination


Or

The instruction at "0x30b26b70" referenced memory at "0x1a5a01b4". The memory could not be "read".

Click on OK to terminate the program.


When you click OK, Visio stops responding (hangs).

Additionally, when you start Task Manager (press CTRL+ALT+DELETE, and then click Task Manager, and then click the Processes tab, the Visio.exe process may consume up to 100 percent of CPU resources.

High CPU Usage 100

High CPU Usage

A collection of useful resources for determining and dealing with the source of 100% CPU usage problems, which cause the system to become unresponsive either intermittently or continuously.

Note that the System Idle Process is supposed to have a high CPU usage rate at idle. This process accounts for unused system time. If your system is responsive and the System Idle Process CPU usage is high, then you do not have a CPU usage issue.

Introduction

If the knowledgebase articles below don't help you to resolve your high or 100 percent CPU usage issue, bear in mind that corrupt system files and drivers, out of date drivers, corrupt applications, viruses, trojans, worms and insufficient RAM can all cause CPU usage to go high. Use the resources that appear after the Knowledgebase Articles for further help in locating the source of the problem:
Software Modems (Internal PCI Modems)

If you are experiencing high CPU usage when you connect to the internet and at various other times whilst connected and if you have an internal modem, then the high CPU usage may be normal behaviour.

Software modems typically have much less hardware than a hardware modem, which is why they cost much less than normal modems. Because the software modem has fewer components, it must draw on the CPU in order to operate. Some software modems will have more impact on the CPU than others. CPU load can range from light to moderate, to decreasing the performance of the computer completely. If this is your situation, there isn't much you can do, short of buying an external modem.

Windows XP Network Troubleshooting

Windows XP Network Troubleshooting

Troubleshooting TCP/IP - Detailed Steps

This article shows how to troubleshoot TCP/IP connectivity between computers on a Windows network.  If you haven’t already done so, disable XP’s Internet Connection Firewall on all local area network connections, and remove all firewall programs on the network.   Improperly configured firewalls are the most common cause of TCP/IP problems.

Open a Command Prompt Window

For many of these steps, you’ll be typing at the command prompt.  To open a command prompt window in Windows 2000 or XP, click Start | Run, type cmd in the box, and click OK.  To open a command prompt window in Windows 95, 98, or Me, click Start | Run, type command in the box, and click OK.  Type one command per line, and press Enter after each one to execute it.  To close the command prompt window, use the exit command.

Determine the TCP/IP Settings


Determine the TCP/IP settings of each computer on the local area network.  In XP, open the Network Connections folder, right click the LAN connection, and click Status | Support | Details.  For example, here are the Status and Details views for the LAN connection on an Internet Connection Sharing host.


In Windows 95/98/Me, click Start | Run, type winipcfg in the box, and click OK.  Select the LAN adapter from the menu, and click More Info.  Here’s the winipcfg view for an ICS client running Windows Me.

You can also see the TCP/IP settings from the command prompt.  This is especially convenient if a computer has more than one network adapter.  Use the ipconfig /all command, which is available in all versions except Windows 95.  The output from this command can be long, so it’s best to write it to a file.  Specify the file name in the command this way:
   ipconfig /all >ipconfig.txt
Here’s the output for a Windows XP ICS host that’s sharing its cable modem connection:

Description of TCP/IP Settings

Here are the TCP/IP settings that are used in network troubleshooting:
  • IP Address – Unique address assigned to a network adapter.  A computer with multiple network adapters has an IP address for each one, and each one must be in a different subnet.
  • Subnet Mask – Used in conjunction with the IP address to determine which subnet an adapter belongs to.  At the simplest level, communication is only possible between two network adapters when they’re in the same subnet.
  • Default Gateway - IP address of a computer or router, on one of this computer’s local area networks, that knows how to communicate with subnets not present on this computer.  For an Internet connection, the default gateway is a router belonging to your Internet service provider, and all access to sites on the Internet goes through it.  For an ICS client, the default gateway is the ICS host.  If you use a hardware router, it serves as the default gateway.
  • DHCP Server – If an adapter is configured to obtain an IP address automatically, this is the address of the server that provides it.  It could be your ISP, an ICS host, or a hardware router.
  • DNS Servers – IP address of one or more Domain Name Server computers.  DNS servers translate Internet names (like www.practicallynetworked.com) to their IP addresses (like 63.146.109.227).

Subnets

See our article on subnets for a brief description of how they work.  For more details, see this Microsoft Knowledge Base article.
If two computers are supposed to be on the same subnet, but aren’t, something is wrong with the network hardware or software configuration.  This is most likely to happen when one of them receives an IP address of 169.254.x.x, which indicates that:
  • It’s configured to obtain an IP address automatically.
  • It couldn’t find a DHPC server on the network to make the assignment.
  • Windows assigned it an Automatic Private IP Address.
See our article on Specific Networking Problems and Their Solutions for more information.

Pinging


The ping command is the basic tool for testing TCP/IP connectivity.  It sends a special packet (called ICMP Echo) to a particular IP address and looks for a reply.  If everything is working right, the reply comes back.  If not, the ping times out in a few seconds.  By default, the ping command repeats the process four times.  Here’s an example of an ICS client computer pinging a Windows XP Home Edition ICS host, using the host’s IP address and its computer name.
When ping fails, you’ll see one of these error messages:
  • Request timed out - The IP address is valid, but there’s no reply from it.  If the IP address is on a local area network, the most likely cause is a firewall program blocking the ping.
  • Unknown host or Ping request could not find host - The computer name doesn’t exist on the local area network.  Make sure that NetBIOS over TCP/IP is enabled.
  • Destination host unreachable – The IP address isn’t on a local area network, and the default gateway can’t access it.  Either there’s no default gateway, its address is wrong, or it isn’t functioning.

Pinging the Local Area Network

Here is a series of ping commands to use in finding where a problem occurs on a local area network.  Run them in the order shown, and don’t go on to the next command until all of the previous commands work properly.  In this example:
  • The computer being tested is named Winxp, with IP address 192.168.1.101.
  • There’s another computer on the network, named Win98, with IP address 192.168.1.123
Substitute the appropriate IP addresses and computer names for your network.
Command
Target
What Ping Failure Indicates
ping 127.0.0.1
Loopback address
Corrupted TCP/IP installation
ping localhost
Loopback name
Corrupted TCP/IP installation
ping 192.168.1.101
This computer’s IP address
Corrupted TCP/IP installation
ping winxp
This computer’s name
Corrupted TCP/IP installation
ping 192.168.1.123
Another computer’s IP address
Bad hardware or NIC driver
ping win98
Another computer’s name
NetBIOS name resolution failure
To fix a corrupted TCP/IP Installation on Windows XP, follow the steps in this Microsoft Knowledge Base article. For Windows 95/98/Me, un-install the TCP/IP protocol in Control Panel | Network, reboot, and re-install it.  If that doesn’t fix it, use this procedure on Windows 95 or 98.

Pinging the Internet

You can also use ping to find a problem with Internet access.  Run these commands in the order shown, and don’t go on to the next command until all of the previous commands work properly.  Use the Default Gateway and DNS Server addresses that you got from the winipcfg or ipconfig /all command. 
Command
Target
What Ping Failure Indicates
ping w.x.y.z
Default Gateway
Default Gateway down
ping w.x.y.z
DNS Server
DNS Server down
ping w.x.y.z
Web site IP address
Internet service provider or web site down
ping www.something.com
Web site name
DNS Server down or web site down

Windows error "USB Device Not Recognized


he Windows error "USB Device Not Recognized., this means the computer may not recognize the USB device. When this issue occurs, the USB device may or may not be listed in Device Manager as an unknown device. This issue mainly occurs because of several factors, which may include the following:

* Host controller hardware;
* USB driver versions;
* Support for USB 2.0;
* Additional system hardware or configurations that may change the timing;
* Attached hubs;
* Attached devices; and so on.

To work around this issue, try one of the solutions below:

1. Unplug the USB device. It is possible that the connection is not secure and has become loose. This is one of the most common reasons for an error in detecting a USB device.
2. Use the Device Manager to scan for new and recently installed hardware. From the start menu, select the 'Run' option. In the pop up box, type in Devmgmt.msc and then click 'Ok'. From the 'Action' Mmnu, click 'scan for hardware changes'. This will make Windows recognize any new devices that are installed. Now, close all device managers and control panels. Now see if your computer will read the USB device.

If that doesn't work, here is another option you can try:

Disable power management of the USB hub. To disable the power management on the USB hub, follow these steps:

* Click Start, and then click Run.
* Type devmgmt.msc in the Open box, and then click OK.
* Expand the Universal Serial Bus controllers' node, and then follow these steps for each USB Root Hub that is listed:
* Right-click the USB Root Hub and then click Properties.
* Click the Power Management tab.
* Click to clear the Allow the computer to turn off this device to save power check box, and then click OK.

Note: If you perform the following procedure on a laptop computer, you may reduce the battery life.

Sometimes, simply unplugging the USB device and turning off the computer for twenty minutes and then restarting may solve the issue. If none of the above options have solved the problem, check the manufacturer's website for new driver information. It is possible that your drivers need to be updated

What is the Welchia worm aka MSBlast.D, LoveSan.D or Nachia?

The Welchia (MSBLAST.D or Nachi) worm infects machines via network connections. It can attack entire networks of computers or one single computer connected to the Internet. Similar to the original MSBlast worm it exploits a known windows vulnerability that is easily patched, however few systems seem to have this patch installed. It attacks Windows 2000 and Windows XP machines and exploits the DCOM RPC Vulnerablity. It uses TFTP (Trivial File Transfer Protocol) to download its files into a system. It also exploits one more vulnerability known as the WebDAV exploit to travel from system to system.

Ironically, this worm attempts to patch the RPC DCOM Buffer Overflow. It first checks for the running Windows version and then downloads a patch from Microsoft. In essence this worm patches your computer against the MSBlast.A worm. When the current system year is 2004, the worm removes itself from the system.


Download the Windows patches for these vulnerabilities by clicking on the links below:

Windows XP: DCOM/RPC Exploit patch

Windows 2000: DCOM/RPC Exploit patch

Windows XP: WebDAV Exploit patch (IIS Remote Exploit from ntdll.dll)

Windows 2000: WebDAV Exploit patch (IIS Remote Exploit from ntdll.dll)

What are the DCOM Vulnerability and WebDAV Exploits?

The DCOM vulnerability in Windows 2000 and XP can allow an attacker to remotely compromise a computer running Microsoft® Windows® and gain complete control over it. The worm causes a buffer overrun in the Remote Procedure Call (RPC) service. When this service is terminated the virus infects the machine and then tries to infect other machines.

The WebDAV exploit is a security issue identified in Microsoft® Windows XP, 2000, and NT running IIS 5.0 that could allow an attacker to take control of your computer. This issue is most likely to affect computers used as Web servers.

How Does the Welchia Worm Infect My Computer?

1. Copies itself to the Wins directory in the System or System32 folder in Windows usually

C:\Windows\System32\Wins\Dllhost.exe for Windows XP or
C:\WinNT\System32\Wins\Dllhost.exe for Windows NT/2000

There is a legitimate file called Dllhost.exe (about 5-6K) in the System32 directory.
2. Makes a copy of the TFTP server (TFTPD.exe) from the Dllcache directory to the following directories.

C:\Windows\System32\Wins\svchost.exe for Windows XP or
C:\WinNT\System32\Wins\svchost.exe for Windows NT/2000

NOTE: Svchost.exe is a legitimate program, which is not malicious, found in the System32 directory
3. Creates the following services:

Service Name: RpcTftpd
Display Name: Network Connections Sharing
File: %System%\wins\svchost.exe

This service will be set to start manually.

Service Name: RpcPatch
Display Name: WINS Client
File: %System%\wins\dllhost.exe

This service will be set to start automatically.

4. Ends the process, MSBLAST, and delete the file %System%\msblast.exe which is dropped by the worm, MSBlast.A. First, it checks the operating system version, then it downloads the appropriate patch from the designated Microsoft Web site. After executing the patch, it reboots the system.

Some of the patches it downloads into the system are as follows:
* http://download.microsoft.com/download/6/9/5/6957d785-fb7a-4ac9-b1e6-cb99b62f9f2a/Windows2000-KB823980-x86-KOR.exe
* http://download.microsoft.com/download/5/8/f/58fa7161-8db3-4af4-b576-0a56b0a9d8e6/Windows2000-KB823980-x86-CHT.exe
* http://download.microsoft.com/download/2/8/1/281c0df6-772b-42b0-9125-6858b759e977/Windows2000-KB823980-x86-CHS.exe
* http://download.microsoft.com/download/0/1/f/01fdd40f-efc5-433d-8ad2-b4b9d42049d5/Windows2000-KB823980-x86-ENU.exe
* http://download.microsoft.com/download/e/3/1/e31b9d29-f650-4078-8a76-3e81eb4554f6/WindowsXP-KB823980-x86-KOR.exe
* http://download.microsoft.com/download/2/3/6/236eaaa3-380b-4507-9ac2-6cec324b3ce8/WindowsXP-KB823980-x86-CHT.exe
* http://download.microsoft.com/download/a/a/5/aa56d061-3a38-44af-8d48-85e42de9d2c0/WindowsXP-KB823980-x86-CHS.exe
* http://download.microsoft.com/download/9/8/b/98bcfad8-afbc-458f-aaee-b7a52a983f01/WindowsXP-KB823980-x86-ENU.exe

The downloaded patch has the file name, RpcServicePack.exe. This worm deletes this file after it is run.

Before downloading or installing the patch on the system, this worm first checks if the system has been previously patched by checking for specific registry keys to make sure the patch hasnt been installed.

The worm travels through a computer network or local area network looking for unpatched and vulnerable machines. The worm will use a ping to determine if the active machine is on a network.Once the worm identifies a machine as being active on the network, it will either send data to TCP port 135, which exploits the DCOM RPC vulnerability, or it will send data to TCP port 80 to exploit the WebDav vulnerability.

Creates a remote shell on the vulnerable host that will connect back to the attacking computer on a random TCP port between 666 and 765 to receive instructions.

Launches the TFTP server on the attacking machine, instructs the victim machine to connect and download Dllhost.exe and Svchost.exe from the attacking machine. If the file, %System%\dllcache\tftpd.exe exists, the worm may not download svchost.exe.

How Can I Remove the Welchia or MSBLAST.D worm?

Follow these steps in removing the Welchia or MSBLAST.D worm.

1) Disconnect your computer from the local area network or Internet

2) Terminate the running program

* Open a command prompt window. Click Start>Run, type CMD and then press the Enter key.
* At the command prompt, type the following:
NET STOP "Network Connections Sharing"
* Press the Enter key. A message should indicate that the service has been stopped successfully.
* Do the same to stop the following service:
NET STOP "WINS Client"
* Close the command prompt window.

3) Remove the Registry Entries

* Open Registry Editor. To do this, click Start>Run, type REGEDIT, then press Enter.
* In the left panel, double-click the following:
HKEY_LOCAL_MACHINE>SYSTEM>CurrentControlSet>Services>
* In the left panel, delete the subkeys:
RpcPatch
RpcTftpd
* Close Registry Editor.

3) Install the patches for the DCOM RPC Exploit or WebDAV exploit, you can download the patches from the links below before disconnecting

DCOM RPC Exploit

Windows XP Pro/Home Edition

Windows 2000

WebDAV Exploit

Windows XP

Windows 2000

4) Delete the infected files (for Windows ME and XP remember to turn off System Restore before searching for and deleting these files to remove infected backed up files as well)

* Click Start, point to Find or Search, and then click Files or Folders.
* Make sure that "Look in" is set to (C:\WINDOWS).
* In the "Named" or "Search for..." box, type, or copy and paste, the file names:
svchost.exe
dllhost.exe
* Click Find Now or Search Now.
* Delete the svchost.exe file in the c:\windows\system32\wins directory
Delete the dllhost.exe file in the c:\windows\system32\wins directory
* Empty the Recycle bin.

5) Reboot the computer, reconnect the network, and update your antivirus software, and run a thorough virus scan using your favorite antivirus program.

What is the MiMail.C Worm?

What is the MiMail.C Worm?
MiMail.C is a mass mailing worm that arrives as a zipped attachment in an email. The zip file has an html file attached. The virus arrives as an email similar to:

From: admin@ (The from address may be spoofed to appear that it is coming from the current domain)

Subject: Re[2]: our private photos

Message:

Hello Dear!,
Finally i've found possibility to right u, my lovely girl :) All our photos which i've made at the beach (even when u're without ur bh:)) photos are great! This evening i'll come and we'll make the best SEX :)

Right now enjoy the photos.
Kiss, James.

Attachment: photos.zip

How Does MiMail.C Worm Infect My System?

Once unzipped, the file photos.htm creates an exe file named foo.exe in the Temporary Internet Files directory and runs it. The expoit is patched by the April 2003 Cumulative Patch.

The following files are then created in the Windows directory

* netwatch.exe
* exe.tmp (temporary copy of message.html)
* zip.tmp (temporary copy of message.zip)

It also adds the following registry key to the system.

HKEY_LOCAL_MACHINE\SOFTWARE\Microsoft\Windows\CurrentVersion\ Run

"NetWatch32" = C:\Windows\netwatch.exe

What Does the MiMail.C Worm Do?

Once a computer is infected, the virus checks to see if the system is connected to the Internet by trying to contact google.com. If it can contact google, then the worm attempts to gather email addresses from the infected computer. It grabs addresses from all files on the system, EXCEPT files that have the following extensions:

* COM
* WAV
* CAB
* PDF
* RAR
* ZIP
* TIF
* PSD
* OCX
* VXD
* MP3
* MPG
* AVI
* DLL
* EXE
* GIF
* JPG
* BMP

These addresses are then stored in a file named eml.tmp in the Windows directory. The worm has its own SMTP engine. For each email address the worms sends, it will

* Look up the MX record for the domain name using the DNS server of the current host. If a DNS server is not found, it will default to 212.5.86.163
* Acquire the mail server associated with that particular domain.
* Directly contact the destination server.

How Can I Remove the MiMail.C worm?

Follow these steps in removing the MiMail.C worm.

1) Terminate the running program

* Open the Windows Task Manager by either pressing CTRL+ALT+DEL on Win9x machines or CTL+Shift+Tab and clicking on the Processes tab on WinNT/2000/XP machines.
* Locate the following program, click on it and End Task or End Process

NETWATCH.EXE

* Close Task Manager

2) Remove the Registry entries

* Click on Start, Run, Regedit
* In the left panel go to

HKEY_LOCAL_MACHINE>Software>Microsoft>Windows>Current Version>Run

* In the right panel, right-click and delete the following entry

"NetWatch32"="%Windows%\netwatch.exe"


* Close the Registry Editor

3) Delete the infected files (for Windows ME and XP remember to turn off System Restore before searching for and deleting these files to remove infected backed up files as well)

* Click Start, point to Find or Search, and then click Files or Folders.
* Make sure that "Look in" is set to (C:\WINDOWS).
* In the "Named" or "Search for..." box, type, or copy and paste, the file names:
netwatch.exe
eml.tmp
zip.tmp
exe.tmp
* Click Find Now or Search Now.
* Delete the displayed files.

4) Reboot the computer and run a thorough virus scan
using your favorite antivirus program.

5) Apply the patch for the April 2003 Cumulative Update to avoid viruses like this in the future.

For Automatic Removal of MiMail.C, download
the Symantec removal tool

Make Pen Drive To Reset Windows 7 Password

Most of us have a PC at home and one at work. We use our work PC most of the times and home PC comparatively less. Did it ever happen to you that you forgot your Windows 7 Password ? Maybe you go for a month long vacations or business trip and when you are back, you may forget some of your passwords to the home Windows 7 PC.

We tend to have lots of passwords at work, online and at various computers. So to save yourself from a locked out situation, we recommend that you create a password reset disk.


In this article, I will share with you a very simple method to create a Windows 7 Password Reset Pen Drive. So next time you are locked out of Windows 7 at the login screen, you can plug in this USB pen drive in your computer and reset the Windows Password.

To create a Windows 7 Password reset pen drive, i advice to have a small capacity pen drive which is cheap and you should keep it at a safe place, but not so safe that you forget where you kept it when you need it sometime in future.

Follow these simple steps:


Step 1. Insert a pen drive (backup any data if present on the pen drive and delete everything). Then go to Windows 7 Start Menu and type “create password reset disk” in the start menu search and launch the program “Create a password reset disk ” which will be highlighted in the search results
Step 3: Now you simple need to keep this drive at a safe place. You can use this in case you forget your Windows 7 Password sometime in future, just click forgotten password on the login screen and choose the option to Reset Password after inserting this pen drive into any of the working USB ports of your computer.
NOTE: Windows will honor only the most recent Password reset disk that you have created, so in case you happen to create more than one disk, only the one which is latest will work, all other old password reset disk will not be able to reset the Windows 7 Password.

If you have not created a reset disk and have forgotten your password, you can still reset the password using some utilities like – Windows Password Recovery Tool. But these processes maybe tedious, lengthy and may cost you money if you need to buy a software to do that. So to avoid any inconvenience later, we recommend that you create a password reset disk.

My pen drive cannot be detected

Trouble:

You may have faced a problem when you insert your pen drive and it gets detected very easily but it doesn’t show up as a drive icon in My Computer. The computer detects the pen drive but data on pen drive is not visible as the pen drive is not visible in My Computer (Explorer).

This problem occurs mainly when windows XP fails to allocate a drive letter to your portable drive(pen drive). It occurs mostly with new pen drives connected to your computer for the first time. If you face such problem then it may not be the pen drive’s fault, rather it may be windows trouble.

Fix:

You can fix this issue by following some simple steps given below.

1. Click Start, click Run, type compmgmt.msc, and then click OK.

2. In the console tree, click Disk Management. The Disk Management window will appear.
3. On this disk management window, you can see some drives including the portable drive. Right click on your portable drive and click change drive letter and paths.

4. Now a assign a new drive letter which is not being used by any of your drives in My Computer.

5. After assigning the new drive letter your portable drive will show up in my computer with other drives

not installing after uninstalling in windows

some times after uninstalling a application and trying to install the same application it will not install .It is due some configuration files regarding that application are not getting uninstalled or removed.

so to tremove these configuration files download mscicuu2.exe file windows installer cleanup

http://download.microsoft.com/download/e/9/d/e9d80355-7ab4-45b8-80e8-983a48d5e4bd/msicuu2.exe

run the clean up

lock the taskbar option not working?


cannot lock taskbar

t may some times caused due to the option has "greyout"

so to make it enable we should edit the registry

goto->start->run->regdit->

then HKEY_CURRENT_USER\Software\Microsoft\Windows\CurrentVersion\policies\explorer

delete the locktaskbar key

what is IDE?


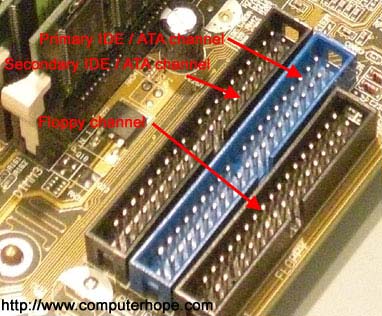
1. Short for Integrated Drive Electronics or IBM Disc Electronics, IDE is more commonly known as ATA and is a standard interface for IBM compatible hard drives. IDE is different from the Small Computer Systems Interface (SCSI) and Enhanced Small Device Interface (ESDI) because its controllers are on each drive, meaning the drive can connect directly to the motherboard or controller. IDE and its updated successor, Enhanced IDE (EIDE), are the most common drive interfaces found in IBM compatible computers today. Below is a picture of the actual IDE connector on the back of a hard disk drive, a picture of what an IDE cable looks like, and the IDE channels it connects to on the motherboard.

Jumpers on back of IDE hard disk drive

40-pin IDE connector and cable

IDE / ATA channel

Additional information about IDE and other computer interfaces can be found here.

2. Short for Integrated Development Environment, IDE also sometimes referred to as IDLE, IDEs are visual tools that allow programmers to develop programs better. Commonly, an IDE may have a compiler, debugger, text editor, and other integrated tools. Smalltalk was the first programming language to have a first true IDE.
What is Incredimail?
Incredimail® is an email program that offers lots of animated characters, also called notifiers, to announce when you have mail. It also offers a wide array of other multimedia options including sounds, animations, ecards, pretty background templates for your email and more. Users of Incredimail generally have a love/hate relationship with it. Many users would not do without it, while some people who have tried it want desperately to remove it completely from their computer.

You'll find listed below instructions on how to remove Incredimail manually, or if you would like an automatic removal program for Incredimail®, click here skip to the bottom of the page.

How Do I Know If I Have Incredimail Installed?

You'll notice an icon similar to the following in the system tray next to the clock if Incredimail is installed on your computer.

Incredimail tray icon

You'll also see a couple new icons on your desktop that look like this.

Incredimail Desktop Icons

If you run Hijackthis, you'll also notice the following lines that have been added:
R0 - HKCU\Software\Microsoft\Internet Explorer\Main,Start Page = http://mystart.incredimail.com/english/
O4 - HKCU\..\Run: [IncrediMail] C:\Program Files\IncrediMail\bin\IncMail.exe /c

Transferring Incredimail Messages to Outlook Express

Incredimail® does not make it easy to move your messages back to Outlook Express. However, there is a good article on About.com that explains what you need to transfer the messages back to OE and how to do it.

How Do I Remove Incredimail®?

1) Click on Start, Settings, Control Panel

2) Double click on Add/Remove Programs

3) Find "Incredimail" in the list of installed programs and click on Change/Remove to uninstall it.
Incredimail in Add Remove Programs

Follow along with the prompts to complete the uninstall.

Problems with Uninstalling Incredimail

Unfortunately, when the normal procedure for uninstalling Incredimail® does not work, it can leave parts of Incredimail® still intact. With over 125 folders, almost 800 files, and close to 2200 registry keys created by Incredimail®, removing it manually can be quite a chore.

In many cases, a regular uninstall will leave the undeleteable file called imshext.dll on the hard drive or remove the option from Add/Remove Programs but leave most if not all of Incredimail intact. The problems removing Incredimail have been so numerous that even Microsoft has a support page on how to remove Incredimail® files manually through the Windows registry. The Microsoft document is focused on fixing the error message "Cannot Find Incredimail.exe" when you open an attachment after removing Incredimail from your computer. From my experience though, this list is incomplete and still leaves bits and pieces floating around.

Here is the list from Microsoft of the items in the registry that should be removed.

Under the HKEY_CLASSES_ROOT key, delete the following keys:
\.ima
\.imf
\.imi
\.imn
\.ims
\.imw
\Applications\Impcontent.exe
\Applications\Incredimail
\Incredicontent
\Incredimessage

b. Under the HKEY_LOCAL_MACHINE key, delete the following keys:
Software\Classes\.imc
Software\Clients\Mail\Incredimail
Software\Elishim\Protect\Browser (remove the Incredimail value)
Software\Incredimail
Software\Microsoft\Direct3D\Most Recent Applications\ (remove the NAME value that points to Incredimail.exe)
\Microsoft\Windows\CurrentVersion\App Paths\Incredimail

c. Delete the HKEY_CURRENT_USER\Software\Microsoft\Windows\CurrentVersion\Explorer\MenuOrder\Start Menu\Programs\Incredimail key.

Because of the many emails I have received concerning how to remove Incredimail®, I decided to create an automatic uninstaller for it. Of course, you could manually remove many of the items in the list above from your registry, but downloading an automatic uninstaller for Incredimail® might be easier.

Remove Incredimail Automatically

I created the following uninstaller for Incredimail® in hopes that it would help people in the many cases where the normal uninstall routine fails. The program will perform the following functions:

* will check for installation folder (default \Program Files\IncrediMail)
* will try to stop the Incredimail® application, if it is running
* will unregister the Incredimail® dll's
* will remove any leftover Incredimail® files and folders
* will remove any Incredimail® registry entries
* will unregister file associations for Incredimail®
* will remove Incredimail® from the Add/Remove Programs screen

In many cases, My Start by Incredimail® will be the Start Page in Internet Explorer, the removal program will change the Start page back to the default one of MSN.com as well as change the Search Companion back to Windows Live Search.

Realtek HD Audio Control Panel may not start, or you receive the "RTHDCPL.EXE - Illegal System DLL Relocation" error in Windows XP

Realtek HD Audio Control Panel may not start,
or you receive the "RTHDCPL.EXE - Illegal System DLL Relocation"
error in Windows XP

Error Message after Installing Security Updates 925902 and 928843
This afternoon (April 3rd, 2007) my Automatic Updates alerted me about a couple updates I needed to install, so I did. Upon rebooting the computer though I was confronted with the following error message

"RTHDCPL.EXE - Illegal System DLL Relocation"

"The system DLL user32.dll was relocated in memory. The Application will not run properly. The relocation occurred because the DLL C:\WINDOWS\SYSTEM32\HHCTRL.OCX occupied an address range reserved for Windows system DLLs. The vendor supplying the DLL should be contacted for a new DLL."


Cause of Error Message

Turns out this error occurs when the Realtek HD Audio Control Panel by Realtek Semiconductor Corporation is installed. This is my built-in sound card on my computer.

The HHCTRL.OCX file that is included in the Security update 928843 and the User32.dll files that is included in Security Update 925902 have conflicting base addresses. When Windows loaded the HHCTRL.OCX file before it loads the User32.DLL file, the problem occurs.

The error occurs when the following third party programs or applications are installed on a computer with Windows XP Service Pack 2 installed.

* Realtek HD Audio Control Panel
* ElsterFormular 2006/2007
* TUGZip
* CD-Tag

Microsoft now has released a patch to correct the problems, you can go to the following link to download and install the patch for the patch :-)

http://support.microsoft.com/kb/935448

NTLDR is Missing. Issue:

NTLDR is Missing.
Issue:

NTLDR is Missing.

Related errors:

Below are the full error messages that may be seen when the computer is booting.

NTLDR is Missing
Press any key to restart

Boot: Couldn't find NTLDR
Please insert another disk

NTLDR is missing
Press Ctrl Alt Del to Restart
Causes:

1. Computer is booting from a non-bootable source.
2. Computer hard disk drive is not properly setup in BIOS.
3. Corrupt NTLDR and/or NTDETECT.COM file.
4. Misconfiguration with the boot.ini file.
5. Attempting to upgrade from a Windows 95, 98, or ME computer that is using FAT32.
6. New hard disk drive being added.
7. Corrupt boot sector / master boot record.
8. Seriously corrupted version of Windows 2000 or Windows XP.
9. Loose or Faulty IDE/EIDE hard disk drive cable.
10. Failing to enable USB keyboard support in the BIOS.

Solutions:

Computer is booting from a non-bootable source

Many times this error is caused when the computer is attempting to boot from a non-bootable floppy disk or CD-ROM. First verify that no floppy diskette is in the computer, unless you are attempting to boot from a diskette.

If you are attempting to boot from a floppy diskette and are receiving this error message it is likely that the diskette does not have all the necessary files and/or is corrupt.

If you are attempting to install Windows XP or Windows 2000 and are receiving this error message as the computer is booting verify that your computer BIOS has the proper boot settings. For example, if you are attempting to run the install from the CD-ROM make sure the CD-ROM is the first boot device, and not the hard disk drive.

Second, when the computer is booting you should receive the below prompt.

Press any key to boot from the CD

Important: When you see this message press any key such as the Enter key immediately, otherwise it will try booting from the hard drive and likely get the NTLDR error again.

Note: If you are not receiving the above message and your BIOS boot options are set properly it's also possible that your CD-ROM drive may not be booting from the CD-ROM properly. Verify the jumpers are set properly on the CD-ROM drive. Additional information about checking the CD-ROM drive connections can be found on document CH000213.

Additional information: This error has also been known to occur when a memory stick is in a card reader and the computer is attempting to boot from it. If you have any type of card reader or flash reader make sure that no memory stick is inside the computer.

Computer hard disk drive is not properly setup in BIOS

Verify that your computer hard disk drive is properly setup in the BIOS / CMOS setup. Improper settings can cause this error. Additional information on how to enter the BIOS / CMOS setup can be found in document CH000192.

Corrupt NTLDR and/or NTDETECT.COM file

Windows 2000 users
Windows XP users

Windows 2000 users

If your computer is using Microsoft Windows 2000 and you are encountering the NTLDR error. Create the below boot.ini file on the floppy diskette drive.

[boot loader]
timeout=30
default=multi(0)disk(0)rdisk(0)partition(1)\WINNT
[operating systems]
multi(0)disk(0)rdisk(0)partition(1)\WINNT="Microsoft Windows 2000 Professional" /fastdetect

Copy the NTLDR and NTDETECT.COM files from another computer using the same operating system. Both of these files are located in the root directory of the primary hard disk drive. For example, C:\NTLDR and C:\NTDETECT.COM should be the locations of these files on many computers.

*

Please keep in mind that these files are hidden system files, if you need additional help with viewing hidden files in Windows please see document CH000516.

Once these files have been copied to a floppy diskette reboot the computer and copy the NTLDR and NTDETECT.COM files to the root directory of the primary hard disk drive. Below is an example of what commonly should be performed from the A:\> drive.

copy ntldr c:
copy ntdetect.com c:

After the above two files have been copied, remove the floppy diskette and reboot the computer.

Windows XP users

1. Insert the Windows XP bootable CD into the computer.
2. When prompted to press any key to boot from the CD, press any key.
3. Once in the Windows XP setup menu press the "R" key to repair Windows.
4. Log into your Windows installation by pressing the "1" key and pressing enter.
5. You will then be prompted for your administrator password, enter that password.
6. Copy the below two files to the root directory of the primary hard disk. In the below example we are copying these files from the CD-ROM drive letter, which in this case is "e." This letter may be different on your computer.

copy e:\i386\ntldr c:\
copy e:\i386\ntdetect.com c:\

7. Once both of these files have been successfully copied, remove the CD from the computer and reboot.

Misconfiguration with the boot.ini file

Edit the boot.ini on the root directory of the hard disk drive and verify that it is pointing to the correct location of your Windows operating system and that the partitions are properly defined. Additional information about the boot.ini can be found on document CH000492.

Attempting to upgrade from a Windows 95, 98, or ME computer that is using FAT32

If you are getting this error message while you are attempting to upgrade to Windows 2000 or Windows XP from Windows 95, Windows 98, or Windows ME running FAT32 please try the below recommendations.

1. Boot the computer with a Windows 95, Windows 98 or Windows ME bootable diskette.
2. At the A:\> prompt type:

sys c:

3. After pressing enter you should receive the "System Transferred" message. Once this has been completed remove the floppy diskette and reboot the computer.

New hard disk drive being added

If you are attempting to add a new hard disk drive to the computer make sure that drive is a blank drive. Adding a new hard disk drive to a computer that already has Windows installed on it may cause the NTLDR error to occur.

If you are unsure if the new drive is blank or not try booting from a bootable diskette and format the new hard disk drive.

Corrupt boot sector / master boot record

It's possible your computer's hard disk drive may have a corrupt boot sector and/or master boot record. These can be repaired through the Microsoft Windows Recovery console by running the fixboot and fixmbr commands.

Additional information and help in getting into the Microsoft Windows Recovery console can be found on document CH000627.

Seriously corrupted version of Windows 2000 or Windows XP

If you have tried each of the above recommendations that apply to your situation and you continue to experience this issue it is possible you may have a seriously corrupted version of Microsoft Windows. Therefore we would recommend you reinstall Microsoft Windows 2000 and Windows XP.

If you are encountering this issue during your setup you may wish to completely erase your computer hard disk drive and all of its existing data and then install Microsoft Windows 2000 / Windows XP. Additional information about erasing the computer and starting over can be found on document CH000186.

Loose or Faulty IDE/EIDE hard disk drive cable

This issue has been known to be caused by a loose or fault IDE/EIDE cable. If the above recommendation does not resolve your issue and your computer hard disk drive is using an IDE or EIDE interface. Verify the computer hard disk drive cable is firmly connected by disconnected and reconnecting the cable.

If the issue continues it is also a possibility that the computer has a faulty cable, try replacing the hard disk drive cable with another cable and/or a new cable.
Additional information:

* See our NTLDR dictionary definition for a complete definition on this term.
Portable drives or cards can be write protected by two ways either by physical lock provided on some of the pen drives, but locking the drive with physical lock is not a good way as any one can move the physical lock and make your drive writable.


Make Drive Write Protected With Physical Lock


Second method to make the drive write protected involves a registry hack which actually is computer dependent not the drive as it deals with registry.


Note: With this registry hack you will actually make all the removable drives connected to your computer write protected, as this registry hack instructs windows to make any removable storage device write protected.


Write Protect Instructions


Download writeprotect.bat in a zip package from

here and extract the files on pen drive and double click writeprotect.bat to make your drive write protected. You will need to eject your pen drive once after launching the batch file to make your drive write protected on the computer.


Disable Write Protect Instructions


Download disablewriteprotect.bat in a zip package from here (this package is same as bove, download any of these two) and extract the files on the pen drive and double click disablewriteprotect.bat to disable write protection on your pen drive. You will need to eject your pen drive once after launching the batch file to disable write protection.

Unable to Download Files Using Internet Explorer - How to Fix It

Unable to Download Files Using
Internet Explorer - How to Fix It

Yesterday I was working on a computer that had a very strange problem. I could bring up web pages just fine, check email, and everything else online. However, when I clicked on a link to download a file to the computer I received a message stating:

"Internet Explorer cannot download filename from this particular webserver". In other words, using pchell.com and the filename fixit.exe as an example, the message stated "Internet Explorer cannot download fixit.exe from pchell.com"

I could use an FTP program just fine and I could download the file using an alternative browser such as
Firefox. So the problem was definitely an Internet Explorer issue.
After trying to repair Internet Explorer to no avail, I discovered the problem lies in the Temporary Internet Files folder. Sometimes the index.dat file can become damaged. If this occurs, you'll have to delete the index.dat file and restart your computer. Then you'll be able to download files correctly again. Follow the steps below to delete this file.
1) Open Internet Explorer.
2) Click on Tools, Click on Internet Options
3) On the General tab under Temporary Internet Files, click on Delete Files
4) Click Ok when it asks if you want to delete the files
5) Under the History section on the General tab, click Clear History, then click Ok
6) Close Internet Explorer
7) Log off the current user and Log onto another user account such as Administrator
8) Click on Start, Run
9) Type CMD and Press Enter to open a command prompt
10) Change directories to the Temporary Internet Files directory by typing the following command, substituting the correct drive letter and the word username with the correct user in Windows XP.

cd drive:\Documents and Settings\username\Local Settings\Temporary Internet Files\Content.IE5
Example: cd c:\Documents and Settings\Mark\Local Settings\Temporary Internet Files\Content.IE5
11) type del index.dat and press Enter
12) Type Exit and press Enter to close the command prompt
13) Restart your computer

Once the computer has been restarted, open a web page with a link to a download. Click on the link and try to download the file. It should now work.

Stop Error 0x0000007E After SP3 is installed

Stop Error 0x0000007E After SP3 is installed
I've had a few computers that will not boot correctly after I've installed Windows XP Service Pack 3 on them. The computer finishes the install and then prompts for a reboot. The computer will start to reboot then give a BSOD Stop Error for a second and reboot again. This process will continue unless the computer is started in Safe Mode. In Safe mode the computer boots correctly and everything seems fine.

This problem only appears on some systems after upgrading to SP3. This particular problem on systems that have been prepared with SysPrep. The sysprep image was created on an Intel based computer, and then the sysprep image is deployed on a Non-Intel system such as an AMD processor.  In these cases, the registry entry for Intelppm is incorrectly set and causes the computer to go into a continuous reboot after the service pack has installed.

How Can I Solve This Problem?

Follow these steps to resolve this issue with the computer not booting correctly after SP3 is installed.

1) Start your computer in Safe Mode.

2) Click on Start, Run, and type REGEDIT and press Enter. This will open the Registry Editor.

3) Click the pluses(+) next to the following registry keys to navigate to the correct spot.
  •  HKEY_LOCAL_MACHINE
  • SYSTEM
  • CurrentControlSet
  • Services
  • Intelppm
4) In the right hand column find the entry titled START and double-click on it

5) Change the number to 4 and click Ok

6) Close the Registry Editor

7) Shut down your computer and restart

This time the computer should restart normally and finish the installation of SP3.